前端 vue2 leaflet 离线地图(以百度地图为例)
思路
下载地图瓦片⇒瓦片存项目中⇒leaflet接入地图,简单配置一下
参考文档:https://juejin.cn/post/7102330662425722894 如果觉得难操作可以看本文的详细操作步骤。
前言
离线地图最好确定好缩放级别和地图的范围,不然瓦片数量会特别多,项目打包直接指数爆炸
前置信息:leaflet的缩放级别从1到18,越大越近。使用leaflet时候一定记得引入其.css文件,不然瓦片错位,这个不用担心,具体代码放在下面了。
leaflet文档: https://leafletjs.cn/reference.html
具体操作
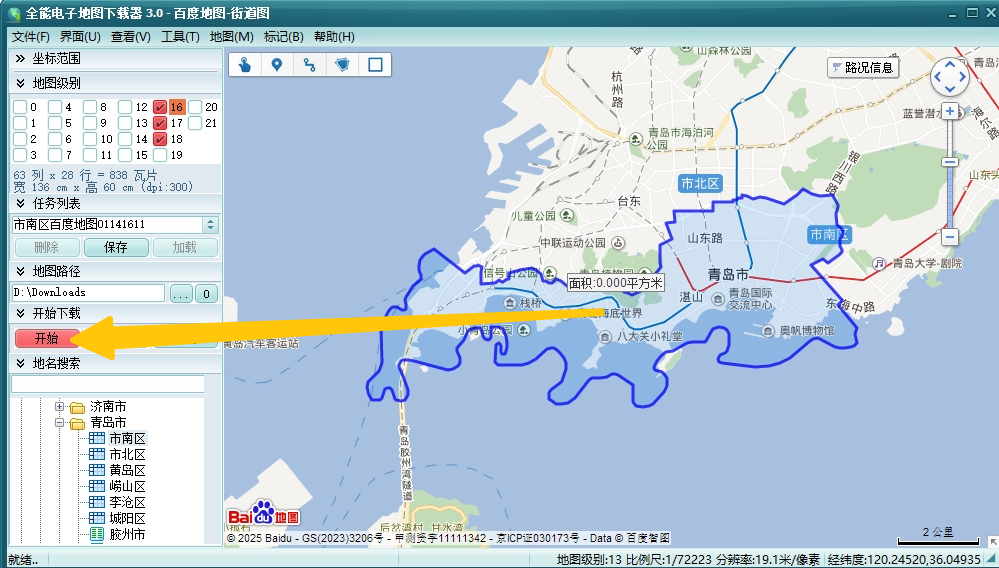
下载瓦片
运行程序下载地址:https://github.com/muddyrain/vue-ol-map 全能地图下载器-MapTileDownloader.rar
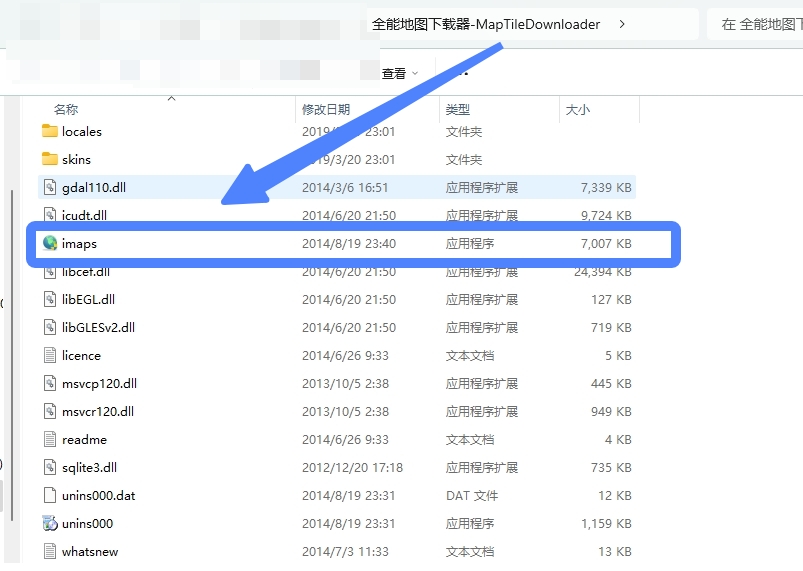
选择地图
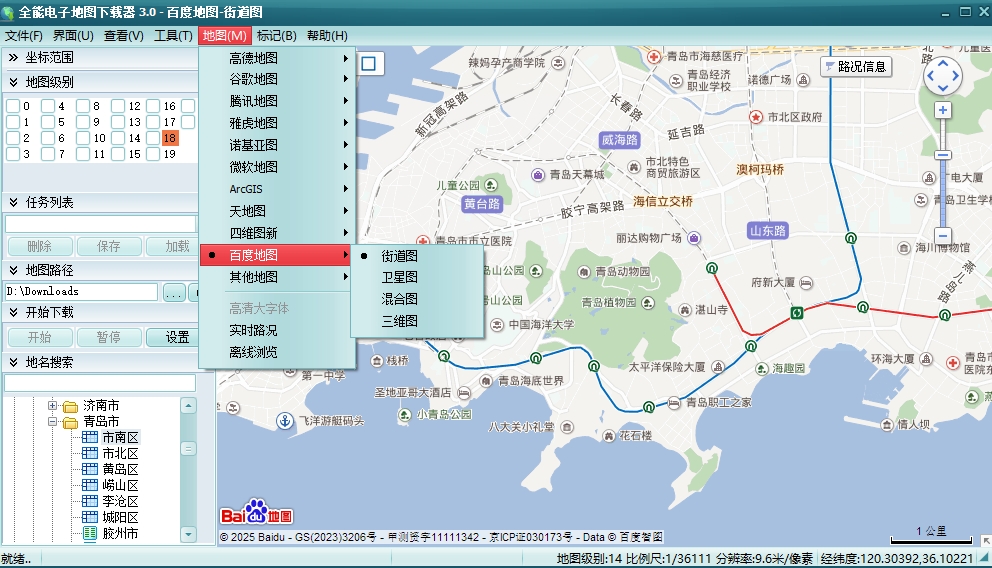
选择地理范围
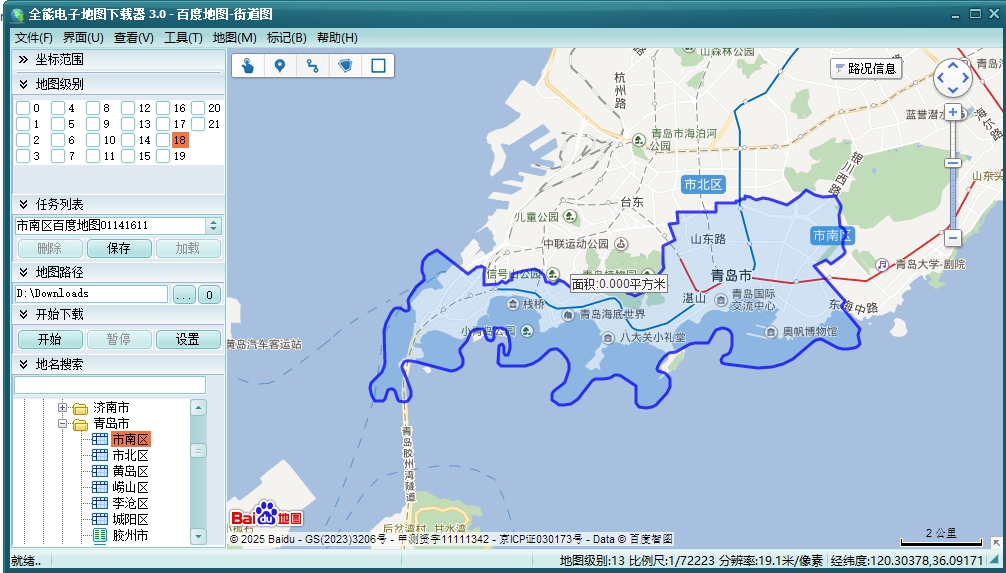
选择地图级别
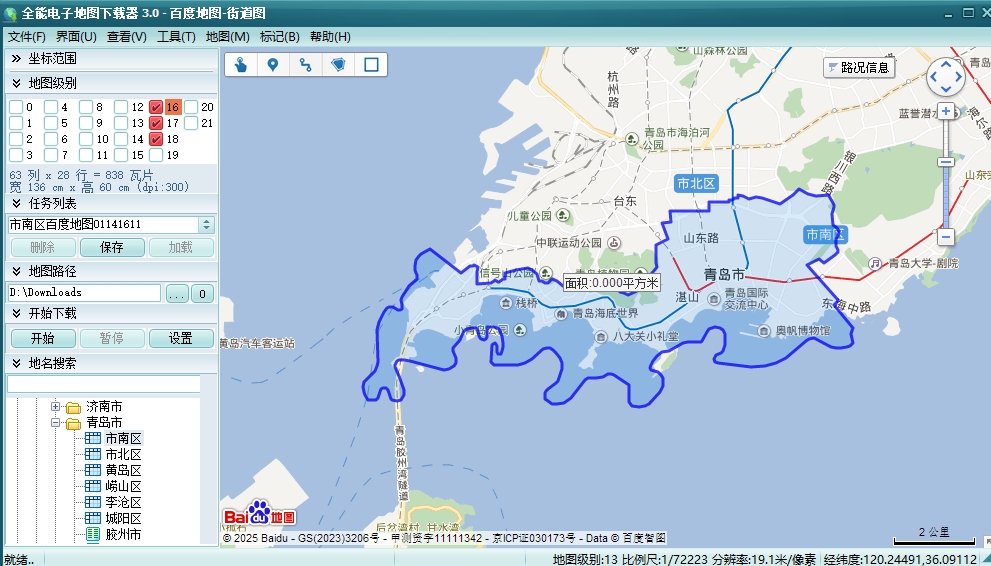
下载,不需要下一步的拼接环节
查看下载结果

瓦片存放
把/16/17/18这些文件夹给复制到项目/public/map里

接入leaflet:通过各种方式下载包到项目。记得引入.css文件。
1
2
// 在项目入口文件引入
import 'leaflet/dist/leaflet.css'使用leaflet
连接本地瓦片的util,有两个注意的点,请看代码注释👇 (文件 tileLayer.baidu.js 需要整个copy)
1
2
3
4
5
6
7
8
9
10
11
12
13
14
15
16
17
18
19
20
21
22
23
24
25
26
27
28
29
30
31
32
33
34
35
36
37
38
39
40
41
42
43
44
45
46
47
48
49
50
51
52
53
54
55
56
57
58
59
60
61
62
63
64
65
66
67
68
69
70
71
72
73
74
75
76
77
78
79
80
81
82
83
84
85
86
87
88
89
90
91
92
93
94
95
96
97
98
99
100
101
102
103
104
105
106
107
108
109
110
111
// 1. 两个包:proj4.js 和 proj4leaflet.js,需要给项目加一下
require('proj4')
require('proj4leaflet')
const L = require('leaflet')
// 2. 瓦片文件位置:本地百度地图离线瓦片地图
const titleD = '/map/{z}/{x}/{y}.png'
var urlPath = titleD
L.CRS.Baidu = new L.Proj.CRS(
'EPSG:900913',
'+proj=merc +a=6378206 +b=6356584.314245179 +lat_ts=0.0 +lon_0=0.0 +x_0=0 +y_0=0 +k=1.0 +units=m +nadgrids=@null +wktext +no_defs',
{
resolutions: (function () {
const level = 19
var res = []
res[0] = Math.pow(2, 18)
for (var i = 1; i < level; i++) {
res[i] = Math.pow(2, 18 - i)
}
return res
})(),
origin: [0, 0],
bounds: L.bounds([20037508.342789244, 0], [0, 20037508.342789244]),
}
)
L.tileLayer.baidu = function (option) {
option = option || {}
var layer
var subdomains = '0123456789'
switch (option.layer) {
//单图层
case 'vec':
default:
layer = L.tileLayer(urlPath, {
name: option.name,
subdomains: subdomains,
tms: true,
})
break
case 'img_d':
layer = L.tileLayer(
'<http://shangetu>{s}.map.bdimg.com/it/u=x={x};y={y};z={z};v=009;type=sate&fm=46',
{
name: option.name,
subdomains: subdomains,
tms: true,
}
)
break
case 'img_z':
layer = L.tileLayer(
'<http://online>{s}.map.bdimg.com/tile/?qt=tile&x={x}&y={y}&z={z}&styles=' +
(option.bigfont ? 'sh' : 'sl') +
'&v=020',
{
name: option.name,
subdomains: subdomains,
tms: true,
}
)
break
case 'custom': //Custom 各种自定义样式
//可选值:dark,midnight,grayscale,hardedge,light,redalert,googlelite,grassgreen,pink,darkgreen,bluish
option.customid = option.customid || 'midnight'
// layer = L.tileLayer('<http://api>{s}.map.bdimg.com/customimage/tile?&x={x}&y={y}&z={z}&scale=1&customid=' + option.customid, {
// name: option.name, subdomains: "012", tms: true
// });
layer = L.tileLayer(urlPath, {
name: option.name,
subdomains: subdomains,
tms: true,
})
break
case 'time': //实时路况
var time = new Date().getTime()
layer = L.tileLayer(
'<http://its.map.baidu.com:8002/traffic/TrafficTileService?x={x}&y={y}&level={z}&time=>' +
time +
'&label=web2D&v=017',
{
name: option.name,
subdomains: subdomains,
tms: true,
}
)
break
//合并
case 'img':
layer = L.layerGroup([
L.tileLayer.baidu({
name: '底图',
layer: 'img_d',
bigfont: option.bigfont,
}),
L.tileLayer.baidu({
name: '注记',
layer: 'img_z',
bigfont: option.bigfont,
}),
])
break
}
return layer
}在文件中创建map,要点请看代码中的注释👇
1
2
<!-- 1.创建id为map的容器 -->
<div id="map"></div>1
2
3
4
5// 2.必要的样式
#map {
width: 100%;
height: 100%;
}1
2
3
4
5
6
7
8
9
10
11
12
13
14
15
16
17
18
19
20
21
22
23
24
25
26
27
28
29
30
31
32
33
34
35
36
37
38
39
40// 3. 引入leaflet 引入刚才创建的工具函数
import * as L from "leaflet";
require("@/utils/tileLayer.baidu");
// 4. 创建map
setMap() {
let latitude = 36.0671;
let longitude = 120.3826;
// 5. 根据需求配置
this.map = L.map("map", {
// 地图中心
center: [latitude, longitude],
// 当前底图缩放级别
zoom: 18,
// 禁止缩放
zoomControl: false,
attributionControl: false,
// 禁止拖拽
dragging: false,
// 最小缩放级别
minZoom: 18,
// 最大缩放级别
maxZoom: 18,
crs: L.CRS.Baidu,
});
L.tileLayer.baidu({ layer: "vec" }).addTo(this.map);
let urlStr = require("@/assets/image/device/device_icon.png");
let Icon = L.icon({
iconUrl: urlStr,
iconSize: [60],
});
const marker = L.marker([latitude, longitude], {
icon: Icon,
});
marker
.addTo(this.map)
.bindPopup(`经度:${longitude}<br> 纬度:${latitude}`)
.openPopup();
},这样就可以了
本博客所有文章除特别声明外,均采用 CC BY-NC-SA 4.0 许可协议。转载请注明来自 Ra-Liz's Blog!
评论
ValineGitalk


